In order to complete this project, you could probably get away with 500
megabytes for a minimum project. Obviously the more space, the more goodies.
Since you will already be running linux to create this project, you can
share the existing swap partition. If you do not currently have a swap
but want one, keep reading, it's creation is explained later in this chapter.
Let's say you are all filled up with no space left to partition. That's
ok because there is a wonderful, free utitlity called fips that will non-destructively
repartition your hard drive. Remember to defragment your windows partition
first if you plan to use fips there. I am not going to provide directions
for this since some pretty good ones already come with it. It's really
not that hard to figure out anyways. Now, assuming you have some free,
unpartitioned hard drive space, let's get down to business. Load up your
origanal linux1 distribution. In this example, we will assume you are
using an IDE type hard drive (as opposed to SCSI) and it is the only hard
drive on your system. At the linux prompt, type fdisk /dev/hda The 'a'
in hda means ide0 - master. If it was a 'b', that would be ide0 - slave.
'c' is ide1 - master. Etc, etc.. That's the way it works in Linux. Now
when you see hda1 later, that just means the partition number 1 on the
drive located on ide0 - master. See how easy that was? Let's take a look
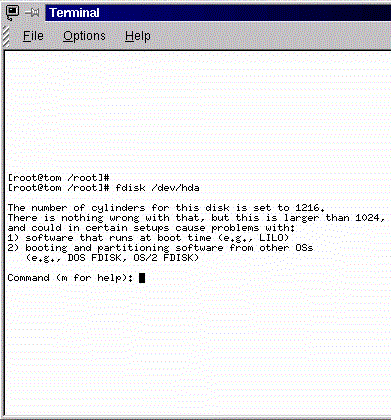
at my screen and explain whats going on a little bit inside this program.

That is what the screen should basically look like after
you typed in the command from above. It is slightly misleading regarding
the cylinder 1023 limitation because with newer versions of the package
lilo, this is no longer a concern. You can safely ignore this if you
are running a newer distribution, but it may be a concern now while
we are creating this if you are using an older version. Basically,
it just means that everything in the /boot directory likes to be below
cylinder 1023 on older Linux distributions. If you fall into this
category, you are probably going to want to limit your partition to
below cylinder 1023 (we'll get to making them in a minute). Now, to
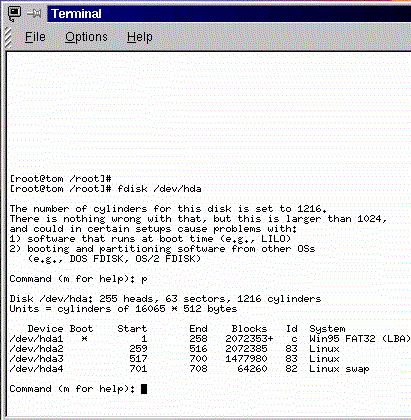
see what partitions are on you hard drive, type p. You will get a
screen that looks something like this.

If you noticed, partition 1 on my drive is windows,
partition 2 is linux, partition 3 is also linux, and partition 4 is
the linux swap. One nice thing, these are all primary partitions.
Linux allows 4 primary partitions where dos/win only allows 1. One
linux partition is for the new distro we are making and the other
is my other distro that's used to create the new distro
Ok, let's get back to that fdisk we started running
a few paragraphs ago
To begin creating partitions, type n at the fdisk prompt.
It will ask you whether this will be a primary partition. Choose p
for primary. Next it will ask you the partition number. Make one partition
for linux and one for swap (if you don't already have a swap partition
from your existing linux distribution).
If by some chance you need/want to remove a partition,
type d and then enter the partition number. If you really mess this
up at anytime, type q at the prompt to quit fdisk without saving.
This is serious stuff here so make sure you get it correct (not that
it will damage the computer but you could wipe out the contents of
your hard drive if you mess up). Now type p again to view what you
have done. Nothing is saved yet so don't worry. How's it looking?
Now, if you notice in the illustration above, my linux
swap partition has a different id number. It is 82 as opposed to 83
(which yours will say if you just created this partition). At the
prompt, type t to toggle the number. It will ask you the partition
number. Enter whatever partition it happens to be. When it asks for
the code, simply type 82 and select enter. Type p at the prompt to
confirm all looks well.
If all is looking well, the final thing to do is type
w to write the partition(s) as well as quit the fdisk program. The
fdisk program may recommend you reboot the computer, if it does, do
it.
Let's make the filesystems on these new partitions.
This is the equivalent of formatting the drive if it were a dos/windows
partition. If you have created your own swap partition because it
didn't exist on your existing Linux distro, you will need to type
mkswap -c /dev/hda4 at the prompt to create the swap filesystem. You
substitute the proper hda number for the correct partition. For the
Linux partition, type mke2fs /dev/hda2. Again, you substitute the
proper hda number.
When you invoke the mke2fs command, the hard drive will
churn for a few seconds and some fancy numbers will come up on the
screen. When it returns you to the prompt, congratulations, you have
a working filesystem on your hard drive ready to accept directories
and files.
Now let's fish around your new linux2 filesystem to
be sure it works (not that there is much to see). Before we are able
to mount it, you'll need to create a directory in your /mnt directory
on linux1 for this partition. I created one called linux2 and you
should call yours the same to help keep us together for the rest of
the project. We'll be using this directory quite a bit so go ahead
and make it by typing mkdir /mnt/linux2.
Now, mount the Linux filesystem you just created like
you would any other device on your system. For example, type mount
/dev/hda2 /mnt/linux2 where /mnt/linux2 is the directory you just
created and /dev/hda2 a Linux partition you created earlier (again,
substitute the proper hda number for your setup). After it is mounted,
type cd /mnt/linux2 to go there. Type ls to have a look around. The
only thing you might notice (maybe not) is a directory in there called
'lost+found'. We don't really need this directory so type rmdir /mnt/linux2/lost+found
to get rid of it if you like. Now the filesystem is empty.
If you have made it this far, I promise that you have
the necessary skills to complete this project. This chapter was truly
the most difficult part.


