Configuring Lilo Boot Loader
 
Hopefully, you are familiar with how to edit text files with vi because
that's what I use. It's not difficult to use but it's a little strange
to get used to. If you are going to be using another editor, that's fine
too. If you want to try vi, type man vi at your prompt to read how to
use it.
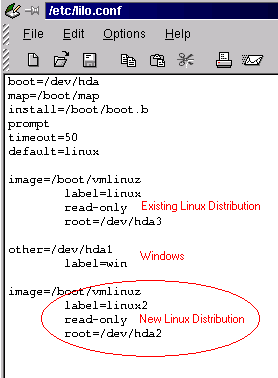
We need to update the /etc/lilo.conf file on your running linux1 system.
Type vi /etc/lilo.conf at the prompt to begin editting the file. Here
is what mine looks like.

Notice the part that I added is circled. If your new Linux
system's partition is not on /dev/hda2, change the wording to where it
is located. The 'label=linux2' means you will type linux2 at the boot
prompt during bootup. vmlinuz is the name of my kernel. It's also the
name of my kernel for my linux1 distribution. This is very important that
these names match (at least at first), otherwise lilo (the bootloader
program) won't work. Basically, just use the same name for your new kernel
as you are using now in your existing linux1 setup. You will be copying
that kernel over in a later chapter, but don't worry, we'll be making
a new kernel soon anyways.
Now, save and exit vi by typing : followed by wq followed
by 'enter'. Type lilo -v at the prompt to update the boot loader. Lilo
should not report any errors, it should just say that it added the filesystems.
It's really as simple as that. If you have ever made your own kernel before
(we'll discuss that in later chapters), it's one of the exact same steps.
|


